반응형

Javascript 문자열에서 텍스트를 제거하는 방법


 Answers

이것은 jQuery와 아무 상관이 없습니다. 다음과 같이 JavaScript replace 기능을 사용할 수 있습니다.

var str = "data-123";
str = str.replace("data-", "");

이 함수에는 정규식을 전달할 수도 있습니다. 다음 예제에서는 숫자를 제외한 모든 것을 바꿉니다.

str = str.replace(/[^0-9\.]+/g, "");
 Question

그 값으로 data-123 을 가진 문자열이 있습니다. 어떻게 jQuery 나 Javascript 를 사용하면 123 을 떠나는 동안 문자열에서 data- 를 제거 할 수 있습니까?


당신은 slice ()를 사용하여 시작부터 끝까지 charterers를 returens (포함 된 끝점)

   string.slice(start , end);

여기에 몇 가지 exmp가 어떻게 작동하는지 보여줍니다 :

var mystr = ("data-123").slice(5); // jast define start point so output is "123"
var mystr = ("data-123").slice(5,7); // define start and end  so output is "12"
var mystr=(",246").slice(1); // returens "246"

Demo


match() 및 Number() 를 사용하여 number 변수 반환 :

Number(("data-123").match(/\d+$/));

// strNum = 123

위 문장이 수행하는 작업은 다음과 같습니다. 중간 작업 :

  1. str.match(/\d+$/) - str 의 끝에있는 임의의 길이의 숫자와 일치하는 배열을 반환합니다. 이 경우 단일 문자열 항목 ['123'] 포함하는 배열을 반환합니다.
  2. Number() - 숫자 유형으로 변환합니다. .match() 에서 반환 된 배열은 단일 요소를 포함하기 때문에 Number() 는 숫자를 반환합니다.


전의:-

var value="Data-123";
var removeData=value.replace("Data-","");
alert(removeData);

바라기를 이것은 당신을 위해 작동 할 것입니다.


str.split('Yes').join('No'); 

이렇게하면 특정 문자열의 모든 항목이 원래 문자열과 바뀝니다.


출처:https://code.i-harness.com/ko/q/9eacd3


반응형

'프로그램 관련 > jquery&jsp&HTML' 카테고리의 다른 글

table 엑셀 다운받기  (0) 2018.08.14
textarea , text글자제한 두기  (0) 2018.08.10
체크박스 초기화 하기  (0) 2018.07.17
jquery 팁  (0) 2018.07.17
정규식표현 전/후방 탐색  (0) 2018.07.16
반응형

GROUP BY 절과 HAVING 절

지금까지 알아본 집계 함수의 예제는 모두 사원 전체를 기준으로 데이터를 추출했는데, 전체가 아닌 특정 그룹으로 묶어 데이터를 집계할 수도 있다. 이때 사용되는 구문이 바로 GROUP BY절이다. 그룹으로 묶을 컬럼명이나 표현식을 GROUP BY 절에 명시해서 사용하며 GROUP BY 구문은 WHERE와 ORDER BY절 사이에 위치한다.

입력

    SELECT department_id, SUM(salary)
      FROM employees
     GROUP BY department_id
     ORDER BY department_id;

결과

    DEPARTMENT_ID  SUM(SALARY)
    ------------- ------------
              10         4400
              20        19000
              30        24900
              40         6500
              50       156400
              60        28800
              70        10000
              80       304500
              90        58000
             100        51608
             110        20308
                         7000
     
    12개의 행이 선택됨.

사원 테이블에서 각 부서별 급여의 총액을 구했다. 위 결과를 보면 30번 부서에 속한 사원들의 급여를 모두 합하면 24900 임을 알 수 있다. 또 다른 쿼리를 수행해 보자.

입력

    SELECT *
      FROM kor_loan_status;

결과

    PERIOD   REGION    GUBUN               LOAN_JAN_AMT
    -------- -------- -------------------- --------------------
    201111   서울     주택담보대출          1.3E+14
    201112   서울     주택담보대출          1.3E+14
    201210   인천     주택담보대출          3.0E+13
    201211   인천     주택담보대출          3.0E+13
    201212   인천     주택담보대출          3.0E+13
    201111   광주     주택담보대출          8.7E+12
    201112   광주     주택담보대출          9.0E+12
    201210   광주     주택담보대출          9.5E+12
    ...
    238개의 행이 선택됨

kor_loan_status 테이블에는 월별, 지역별 가계대출 잔액(단위는 십억)이 들어 있고, 대출유형(gubun)은 ‘주택담보대출’과 ‘기타대출’ 두 종류만 존재한다. 그럼 2013년 지역별 가계대출 총 잔액을 구해 보자.

입력

    SELECT period, region, SUM(loan_jan_amt) totl_jan
      FROM kor_loan_status
     WHERE period LIKE '2013%'
     GROUP BY period, region
     ORDER BY period, region;

결과

    PERIOD   REGION     TOTL_JAN
    -------- ---------- -------------
    201310   강원       18190.5
    201310   경기       281475.5
    201310   경남       55814.4
    ....
     
    34개의 행이 선택됨.

이번엔 2013년 11월 총 잔액만 구해 보자.

입력

    SELECT period, region, SUM(loan_jan_amt) totl_jan
      FROM kor_loan_status
     WHERE period = '201311'
     GROUP BY region
     ORDER BY region;

결과

    SQL 오류: ORA-00979: GROUP BY 표현식이 아닙니다.

왜 오류가 발생한 것일까? 그룹 쿼리를 사용하면 SELECT 리스트에 있는 컬럼명이나 표현식 중 집계 함수를 제외하고는 모두 GROUP BY절에 명시해야 하는데, 앞의 쿼리는 period 컬럼을 명시하지 않아 오류가 난 것이다. 2013년 데이터는 2013년 10월과 11월만 존재하며 WHERE 절에서 기간을 201311로 주었으므로 굳이 period를 그룹에 포함시킬 필요는 없지만, 구문 문법상 GROUP BY 절에 포함시켜야 한다.

HAVING 절은 GROUP BY절 다음에 위치해 GROUP BY한 결과를 대상으로 다시 필터를 거는 역할을 수행한다. 즉 HAVING 필터 조건 형태로 사용한다. 예를 들어, 위 쿼리 결과에서 대출잔액이 100조 이상인 건만 추출한다면 다음과 같이 쿼리를 작성하면 된다.

입력

    SELECT period, region, SUM(loan_jan_amt) totl_jan
      FROM kor_loan_status
     WHERE period = '201311'
     GROUP BY period, region
    HAVING SUM(loan_jan_amt) > 100000
    ORDER BY region;

결과

    PERIOD  REGION     TOTL_JAN
    ------- ---------- -----------
    201311   경기      282816.4
    201311   서울      334062.7

경기도와 서울의 대출잔액이 100조 이상인 것을 보면, 대한민국에서는 수도권 인구가 타 지역에 비해 많고 집값도 높다는 점을 유추해 볼 수 있다. 주의할 점은 WHERE 절은 쿼리 전체에 대한 필터 역할을 하고, HAVING 절은 WHERE 조건을 처리한 결과에 대해 GROUP BY를 수행 후 산출된 결과에 대해 다시 조건을 걸어 데이터를 걸러낸다는 점을 잊지 말자.


출처 :https://thebook.io/006696/part01/ch05/02/

반응형

'프로그램 관련 > oracle' 카테고리의 다른 글

oracle union all 입니다  (0) 2018.08.22
오라클 권한부여/권한취소  (0) 2018.08.14
oracle 과거데이터 조회하기  (0) 2018.08.10
oracle Rank, rownum. row_number  (0) 2018.08.08
oracle concat  (0) 2018.08.02
반응형

JSTL 특정 문자 찾기

<%@ taglib uri="http://java.sun.com/jsp/jstl/core" prefix="c"%>

<%@ taglib uri="http://java.sun.com/jsp/jstl/function" prefix="c"%>


<c:set var="aa" value=" i love test">


<c:if test="${fn:contains(aa,'love')}">

love가 있습니다

</c:if>


<c:if test="${fn:contains(aa,'rove')}">

love가 없습니다

</c:if>


결과 love가 있습니다

로 찾아내어 false true을 알수있습니다


반응형
반응형


체크박스 초기화 하기


$("input[type=checkbox][checked]").each(

function () {

$(this).attr('checked'false);

}

);


~~
$(this).attr('checked'false);


this 대신


$("#id").attr('checked', false);


도 가능 합니다

반응형

'프로그램 관련 > jquery&jsp&HTML' 카테고리의 다른 글

textarea , text글자제한 두기  (0) 2018.08.10
jquery 문자열 자르기 방식  (0) 2018.07.26
jquery 팁  (0) 2018.07.17
정규식표현 전/후방 탐색  (0) 2018.07.16
jquery(.before.after,.append,prepend) 사용기  (0) 2018.07.16
반응형

# iptables -L  : 방화벽 설정 확인


# iptables -A INPUT -p tcp --dport 3306 -j ACCEPT  : 3306포트 방화벽 뚫어주기

# service iptables save : 설정한 내용을 저장한다.

# /etc/init.d/iptables restart : 포트변경후 iptables 재시작


------------

서버를 재시작한 이후에도 계속 설정을 유지하는 방법중에는 iptables의 설정파일에 추가해주는 방법도 있다.

# vi /etc/sysconfig/iptables

-A RH-Firewall-1-INPUT -s your.ip.address.com/255.255.255.255 -m state --state NEW -m tcp -p tcp --dport 80 -j ACCEPT

위에 설정을 추가해주면 해당 아이피에서 80포트로 들어오는 패킷을 허용한다.

# /etc/init.d/iptables restart


반응형
반응형

How To Install Apache Tomcat 7 on Ubuntu 14.04 via Apt-Get

Author: Mitchell Anicas  Published: Apr 18, 2014  Updated: May 30, 2014

About Apache Tomcat

Apache Tomcat is an application server that is used to serve Java applications to the web. Tomcat is an open source implementation of the Java Servlet and JavaServer Pages technologies, released by the Apache Software Foundation.

This tutorial covers the basic installation and some configuration of Tomcat 7.0.x, the latest stable version at the time of writing, on your Ubuntu 14.04 VPS.

There are two basic ways to install Tomcat on Ubuntu:

  • Install through apt-get. This is the simplest method.

  • Download the binary distribution from the Apache Tomcat site. This guide does not cover this method; refer to Apache Tomcat Documentation for instructions.

For this tutorial, we will use the simplest method: apt-get. Please note that this will install the latest release of Tomcat that is in the official Ubuntu repositories, which may or may not be the latest release of Tomcat. If you want to guarantee that you are installing the latest version of Tomcat, you can always download the latest binary distribtion.

Step One — Prerequisites

Before you begin with this guide, you should have a separate, non-root user account set up on your server. You can learn how to do this by completing steps 1-4 in the initial server setup for Ubuntu 14.04. We will be using the demo user created here for the rest of this tutorial.

Step Two - Install Tomcat

The first thing you will want to do is update your apt-get package lists:

sudo apt-get update

Now you are ready to install Tomcat. Run the following command to start the installation:

sudo apt-get install tomcat7

Answer yes at the prompt to install tomcat. This will install Tomcat and its dependencies, such as Java, and it will also create the tomcat7 user. It also starts Tomcat with its default settings.

Tomcat is not completely set up yet, but you can access the default splash page by going to your domain or IP address followed by :8080 in a web browser:

http://your_ip_address:8080

You will see a splash page that says "It works!", in addition to other information. Now we will go deeper into the installation of Tomcat.

Step Three - Installing Additional Packages

Note: This section is not necessary if you are already familiar with Tomcat and you do not need to use the web management interface, documentation, or examples. If you are just getting into Tomcat for the first time, please continue.

With the following command, we will install the Tomcat online documentation, the web interface (manager webapp), and a few example webapps:

sudo apt-get install tomcat7-docs tomcat7-admin tomcat7-examples

Answer yes at the prompt to install these packages. We will get into the usage and configuration of these tools in a later section. Next, we will install the Java Development Kit.

Step Four - Install Java Development Kit (Optional)

If you are planning on developing apps on this server, you will want to be sure to install the software in this section.

The Java Development Kit (JDK) enables us to develop Java applications to run in our Tomcat server. Running the following command will install openjdk-7-jdk:

sudo apt-get install default-jdk

In addition to JDK, the Tomcat documentation suggests also installing Apache Ant, which is used to build Java applications, and a source control system, such as git. Let's install both of those with the following command:

sudo apt-get install ant git

For more information about Apache Ant, refer to the official manual. For a tutorial on using git, refer to DigitalCloud's Git Tutorial.

Step 5 - Configure Tomcat Web Management Interface

In order to use the manager webapp installed in Step 3, we must add a login to our Tomcat server. We will do this by editing the tomcat-users.xml file:

sudo nano /etc/tomcat7/tomcat-users.xml

This file is filled with comments which describe how to configure the file. You may want to delete all the comments between the following two lines, or you may leave them if you want to reference the examples:

<tomcat-users>
</tomcat-users>

You will want to add a user who can access the manager-gui and admin-gui (the management interface that we installed in Step Three). You can do so by defining a user similar to the example below. Be sure to change the password and username if you wish:

<tomcat-users>
    <user username="admin" password="password" roles="manager-gui,admin-gui"/>
</tomcat-users>

Save and quit the tomcat-users.xml file. To put our changes into effect, restart the Tomcat service:

sudo service tomcat7 restart

Step 6 - Access the Web Interface

Now that we've configured an admin user, let's access the web management interface in a web browser:

http://your_ip_address:8080

You will see something like the following image:
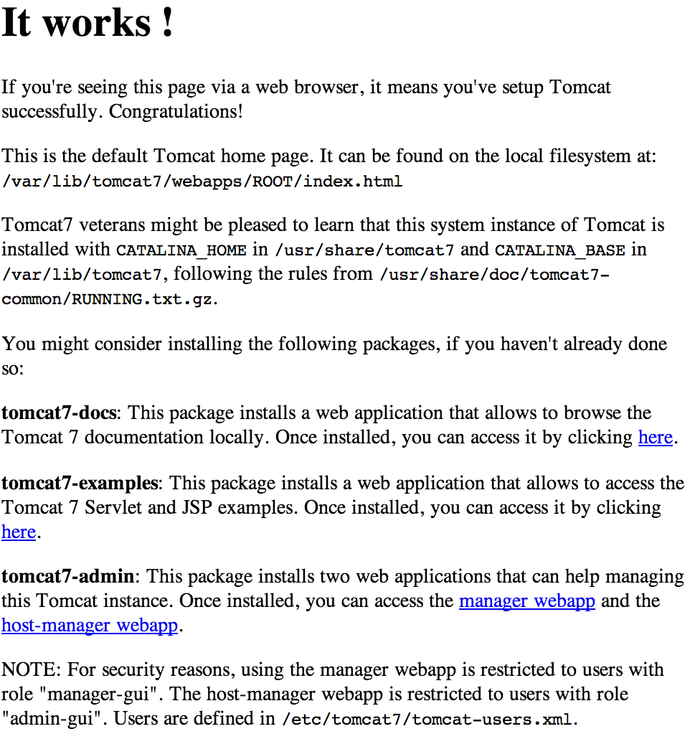
As you can see, there are four links to packages you installed in Step Three:

  • tomcat7-docs: Online documentation for Tomcat. Accessible via http://your_ip_address:8080/docs/
  • tomcat7-examples: Tomcat 7 Servlet and JSP examples. You can click through the example webapps to get a basic idea of how they work (and also look at the source code to see how they were implemented). Accessible via http://your_ip_address:8080/examples/
  • tomcat7-admin (manager-webapp): Tomcat Web Application Manager. This will allow you to manage and your Java applications.
  • tomcat7-admin (host-manager): Tomcat Virtual Host Manager.

Let's take a look at the Web Application Manager, accessible via the link or http://your_ip_address:8080/manager/html:
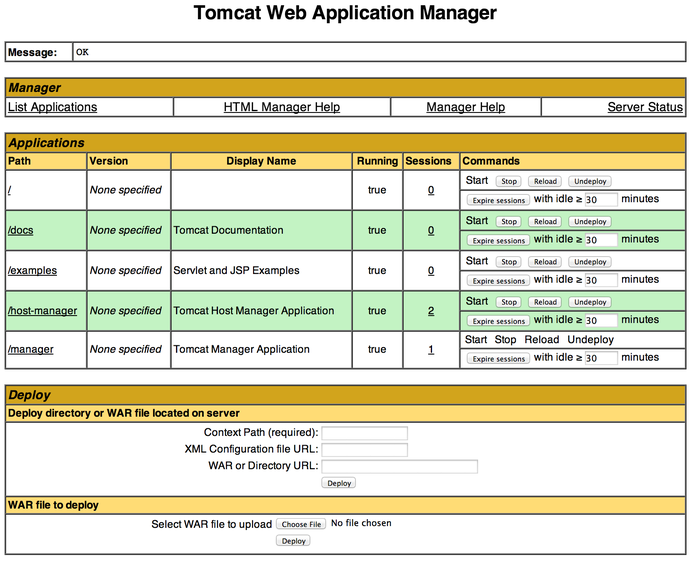
The Web Application Manager is used to manage your Java applications. You can Start, Stop, Reload, Deploy, and Undeploy here. You can also run some diagnostics on your apps (i.e. find memory leaks). Lastly, information about your server is available at the very bottom of this page.

Now let's take a look at the Virtual Host Manager, accessible via the link or http://your_ip_address:8080/host-manager/html/:
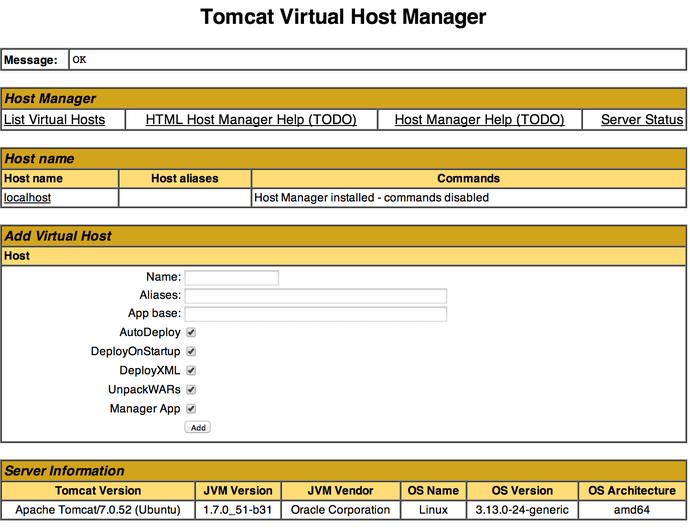
From the Virtual Host Manager page, you can add virtual hosts to serve your applications in.

Finished!

Your installation of Tomcat is complete! Your are now free to deploy your own webapps!

By Mitchell Anicas


반응형
반응형

Tomcat 의 log 관련설정법입니다.


많은 개발자들이 개발환경으로 Tomcat 을 많이 사용하고 있습니다. 그리고 log 처리는 log4j를 사용합니다.

그러나 JDK에서 기본으로 제공하는 Logging 클래스도 꽤 쓸만한 기능을 제공하고 있습니다.


java.util.logging 추상 클래스가 바로 그것인데요, 이 클래스를 상속받아 구현한 클래스를 줄여서 JULI 라고 부릅니다. 


운영시에야 효율을 위해 최소한의 로그를 남기는것이 좋겠지만, 반대로 개발시에는 최대한의 많은 로그를 남기는것이 디버깅에 효과적입니다.


1. logging.properties의 위치

 a) 기본적인 Global 설정은 tomcat 디렉토리의 conf 입니다.

  - 이곳에 파일을 두고 설정하면 해당 컨테이너에 등록되는 모든 Application설정을 한방에 할수 있습니다.

 b) Application 별로 설정하고 싶다면, /WEB-INF/classes/ 밑에 logging.properties 를 두면 됩니다.


2. 설정방법

- 기본적으로 제공하는 핸들러는 java.util.logging.FileHandler 와 java.util.logging.ConsoleHandler 가 있습니다.

- java.util.logging.ConsoleHandler 는 기본출력 (catalina.out)으로 출력하는 핸들러이고,

- java.util.logging.FileHandler 는 날짜별로 롤링되는 특정파일에 출력하는 핸들러입니다.

- level 은 다음과 같이 ALL, FINEST, FINER, FINE, CONFIG, INFO, WARNING, SEVERE를 지원하며

- 오늘쪽으로 갈수록 로그량이 적습니다.


3. 설정예제

- org.apache.tomcat.util.net.TcpWorkerThread 클래스에 대해서 로그를 추가하고 싶을때

ex)
org.apache.tomcat.util.net.TcpWorkerThread.level = ALL
org.apache.tomcat.util.net.TcpWorkerThread.handler = java.util.logging.ConsoleHandler


- org.apache.tomcat.util.net 하위 클래스에 대해서 로그를 추가하고 싶을때

ex)
org.apache.tomcat.util.net.level = ALL
org.apache.tomcat.util.net.handler = java.util.logging.ConsoleHandler


이런식으로 로깅하고 싶은 클래스 또는 패키지를 지정해서 .level = XXX , .handler = java.util.logging.ConsoleHandler 를 달아주기만 하면 됩니다.


참 쉽죠~?


출처 - http://cafe.naver.com/hermeneus.cafe?iframe_url=/ArticleRead.nhn%3Farticleid=98&


===================================================================================


tomcat 로그 저장 위치 변경 하기


tomcat logs 디렉토리(${catalina.base}/logs)에 저장되는 로그는 아래와 같은 곳에서 설정이 가능합니다.


- catalina.out 

  ${catalina.base}/bin/catalina.sh


- host-manager, localhost, manager

  ${catalina.base}/conf/logging.properties


- localhost_access_log

  ${catalina.base}/conf/server.xml


로그 저장 위치를 원하는 곳으로 변경 하는 방법은 두가지로 생각해 볼 수 있습니다.


첫번째는 logging.properies, catalina.sh, server.xml 등에서 디렉토리를 변경하는 방법이고

두번째는 ${catalina.base}/logs 디렉토리를 원하는 디렉토리로 soft link 시키는 방법입니다.


1. 각 설정에서 logging 디렉토리 변경

# vi /usr/local/tomcat/conf/logging.properties


변경 전


1catalina.org.apache.juli.FileHandler.level = FINE

1catalina.org.apache.juli.FileHandler.directory = ${catalina.base}/logs

1catalina.org.apache.juli.FileHandler.prefix = catalina.


변경 후


1catalina.org.apache.juli.FileHandler.level = FINE

1catalina.org.apache.juli.FileHandler.directory = /var/log/tomcat

1catalina.org.apache.juli.FileHandler.prefix = catalina.


# vi /user/local/tomcat/bin/catalina.sh


변경 전


if [ -z "$CATALINA_OUT" ] ; then

  CATALINA_OUT="$CATALINA_BASE"/logs/catalina.out

fi


변경 후

if [ -z "$CATALINA_OUT" ] ; then

  CATALINA_OUT=/var/log/tomcat/catalina.out

fi


# vi /user/local/tomcat/conf/server.xml


변경 전


<Valve className="org.apache.catalina.valves.AccessLogValve" directory="logs" prefix="localhost_access_log." suffix=".txt"

pattern="%h %l %u %t &quot;%r&quot; %s %b" />


변경 후


<Valve className="org.apache.catalina.valves.AccessLogValve" directory="/var/log/tomcat" prefix="localhost_access_log." suffix=".txt"

pattern="%h %l %u %t &quot;%r&quot; %s %b" />


2. ${catalina.base}/logs 디렉토리를 원하는 디렉토리로 soft link 

# ln -s /var/log/tomcat /usr/local/tomcat/logs


반응형
반응형

1. apt-get 으로 openjdk 설치


기본적으로 Ubuntu에서 지원하는 apt를 가지고 설치를 할 수 있습니다.

apt 로 설치할 수 있는 항목은 openjdk입니다.


Ubuntu Desktop 버전에서는 우분투 소프트웨어 센터에서 UI 화면을 보면서 설치할 수 있습니다.


터미널에서는 아래와 같이 명령을 주면 됩니다.


$ sudo apt-get install openjdk-7-jdk


openjdk 도 jdk 역할을 하지만, oracle에서 제공하는 jdk를 사용하는 분들은 아래와 같이 진행하면 됩니다.


2. apt-get 으로 oracle-java7 jdk 설치하기


apt-get 으로 oracle에서 제공하는 jdk를 설치하려면 아래와 같이 하면 됩니다.


$ sudo add-apt-repository ppa:webupd8team/java
$ sudo apt-get update
$ sudo apt-get install oracle-java7-installer


반응형
반응형

ubuntu Postgresql password변경


sudo -u postgres psql postgres

# \password postgres

Enter new password: 사용할 비밀번호


반응형
반응형

linux hdd mount 하기


디스크가 인식되었는지 확인합니다.
$ sudo fdisk -l


파티션 할당합니다.
$ sudo fdisk /dev/sdb1

m 눌러서 명령을 봅니다.

n 눌러서 파티션을 추가합니다.

p 파티션 생성

파티선 생성이 끝나면


w 눌러서 저장합니다.

리부팅 합니다.

파티션을 포맷합니다.  (파티션을 하나로 잡았을경우)
$ sudo mkfs.ext3 /dev/sdb1

마운트할 디렉토리를 만듭니다.
$ sudo mkdir /pub

마운트 합니다.
$ sudo mount /dev/sdb1 /pub


자동 마운트 설정을 추가합니다.
$ sudo vi /etc/fstab

다음 부분 추가합니다.
/dev/sdb1 /pub ext3 defaults,errors=remount-rw 0 1


* 요즘은 UUID로 입력한는 경우가 많습니다


UUID 확인

$ ls -l /dev/disk/by-uuid


자동 마운트 설정을 추가합니다.
$ sudo vi /etc/fstab

다음 부분 추가합니다.
UUID='UUID' /마운트할/폴더명 ext3 defaults 0 1


반응형

+ Recent posts